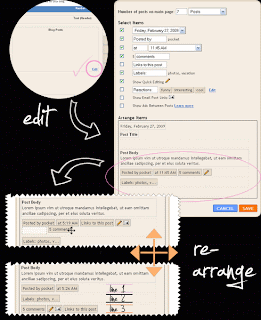
► because we'd like to rearrange the elements in post footer (divide them, change positions)
► move one (or more) of the elements somewhere else (like: under the Post Title)
REARRANGING ELEMENTS
You can rearrange Post footer elements without tweaking the code:
DASHBOARD ► LAYOUT ► PAGE ELEMENTS click on Edit in BLOG POSTS box:
 If this works for you, great!
But, lots of times, you CAN rearrange the elements by "dragging" them around, and they will seem to be rearranged, and when you go check your Blog - NOTHING has changed!
You can solve this with:
► with clearing your cache (if you're lucky)
► by manually rearranging the elements in HTML code
If you're ready, let's go visit the HTML of our template....
Before making any changes to your code, I suggest to back up the current Blogger layout. Then go to:
LAYOUT ► EDIT HTML ► click on Expand Widget Templates

Use the [CTRL] + F (or (Edit ► Find from your browser's menu) and search for this line:
<div class='post-footer'>
Post-footer is divided in 3 lines, and each line has some elements in it(Labels, Comment Link, Posted by, Timestamp...) wrapped in a span.<div class='post-footer'>
<div class='post-footer-line post-footer-line-1'>
<span class='post-author vcard'>
<b:if cond='data:top.showAuthor'>
<data:top.authorLabel/>
<span class='fn'><data:post.author/></span>
</b:if>
</span>
<span class='post-timestamp'>
<b:if cond='data:top.showTimestamp'>
<data:top.timestampLabel/>
<b:if cond='data:post.url'>
<a class='timestamp-link' expr:href='data:post.url' rel='bookmark' title='permanent link'><abbr class='published' expr:title='data:post.timestampISO8601'><data:post.timestamp/></abbr></a>
</b:if>
</b:if>
</span>
<span class='post-comment-link'>
<b:if cond='data:blog.pageType != "item"'>
<b:if cond='data:post.allowComments'>
<a class='comment-link' expr:href='data:post.addCommentUrl' expr:onclick='data:post.addCommentOnclick'><b:if cond='data:post.numComments == 1'>1 comment<b:else/><data:post.numComments/> comments</b:if></a>
</b:if>
</b:if>
</span>
</div>
...in orange, you can see how to identify the Post-footer line (in this example, 1st line)<div class='post-footer-line post-footer-line-1'>
<span class='post-author vcard'>
<b:if cond='data:top.showAuthor'>
<data:top.authorLabel/>
<span class='fn'><data:post.author/></span>
</b:if>
</span>
<span class='post-timestamp'>
<b:if cond='data:top.showTimestamp'>
<data:top.timestampLabel/>
<b:if cond='data:post.url'>
<a class='timestamp-link' expr:href='data:post.url' rel='bookmark' title='permanent link'><abbr class='published' expr:title='data:post.timestampISO8601'><data:post.timestamp/></abbr></a>
</b:if>
</b:if>
</span>
<span class='post-comment-link'>
<b:if cond='data:blog.pageType != "item"'>
<b:if cond='data:post.allowComments'>
<a class='comment-link' expr:href='data:post.addCommentUrl' expr:onclick='data:post.addCommentOnclick'><b:if cond='data:post.numComments == 1'>1 comment<b:else/><data:post.numComments/> comments</b:if></a>
</b:if>
</b:if>
</span>
</div>
...in pink you can see the code of Posted by, in green of Timestamp, and in blue of Comment Link
Notice how each element is wrapped in a span:
<span class='post-author vcard'>
<b:if cond='data:top.showAuthor'>
<data:top.authorLabel/>
<span class='fn'><data:post.author/></span>
</b:if>
</span>
...in orange, you can see the opening span and closing span<b:if cond='data:top.showAuthor'>
<data:top.authorLabel/>
<span class='fn'><data:post.author/></span>
</b:if>
</span>
Span class identifies the element:
| span class='post-author vcard' ► Posted By |
| span class='post-timestamp' ► Timestamp |
| span class='post-labels' ► Labels |
| span class='post-comment-link' ► Comment link |
| span class='post-backlinks ► Links to this post |
| span class='post-icons' ► Email this post icon and Quickedit icon |
| span class='reaction-buttons' ► Reactions |
| span class='star-ratings' ► Star ratings |
| span class='post-location' ► Post location |
The whole idea of rearranging elements manually is a simple CUT and PASTE:
► CUT the code of the element you'd like to move
► PASTE it in the line you prefer
You need to cut the entire code of the element, meaning the whole Span. For example, if I want to move the Labels in the first line, I'll CUT the code representing Labels:
<span class='post-labels'>
<b:if cond='data:post.labels'>
<data:postLabelsLabel/>
<b:loop values='data:post.labels' var='label'>
<a expr:href='data:label.url' rel='tag'><data:label.name/></a><b:if cond='data:label.isLast != "true"'>,</b:if>
</b:loop>
</b:if>
</span>
...and PASTE in somewhere under the 1st Post footer line:<b:if cond='data:post.labels'>
<data:postLabelsLabel/>
<b:loop values='data:post.labels' var='label'>
<a expr:href='data:label.url' rel='tag'><data:label.name/></a><b:if cond='data:label.isLast != "true"'>,</b:if>
</b:loop>
</b:if>
</span>
<div class='post-footer-line post-footer-line-1'>
...apply the same rule for other elements.MOVE THE ELEMENT FROM POST FOOTER UNDER THE POST TITLE
Same way you rearranged the elements in Blogger post footer, you'll move them under your Post Title.
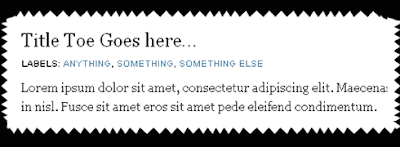
 For this example, I've chosen to place my Blog Labels under the Post title.
1. First thing is to CUT the code of the element we'd like to move (Labels in my example):
<span class='post-labels'>
<b:if cond='data:post.labels'>
<data:postLabelsLabel/>
<b:loop values='data:post.labels' var='label'>
<a expr:href='data:label.url' rel='tag'><data:label.name/></a><b:if cond='data:label.isLast != "true"'>,</b:if>
</b:loop>
</b:if>
</span>
..the code you CUT needs to be wrapped in a Span (in orange) (DO NOT cut anything extra!)<b:if cond='data:post.labels'>
<data:postLabelsLabel/>
<b:loop values='data:post.labels' var='label'>
<a expr:href='data:label.url' rel='tag'><data:label.name/></a><b:if cond='data:label.isLast != "true"'>,</b:if>
</b:loop>
</b:if>
</span>
2. PASTE your code into Notepad (Texedit)
3. Locate this line in your code:
<div class='post-header-line-1'/>
...and place your Labels code UNDER this line.You will notice that the Labels are now in place, but without the default style. The reason this happened is because we've "ripped" the Labels from Post Footer, which has a defined style.
4. We have to create a style for the Labels element, and adjust it to fit. Add the code in orange around the Labels code:
<div class='under-title'>
<span class='post-labels'>
<b:if cond='data:post.labels'>
<data:postLabelsLabel/>
<b:loop values='data:post.labels' var='label'>
<a expr:href='data:label.url' rel='tag'><data:label.name/></a><b:if cond='data:label.isLast != "true"'>,</b:if>
</b:loop>
</b:if></span>
</div>
...we've just wrapped the Labels code in a "div" so we can manipulate with it better.<span class='post-labels'>
<b:if cond='data:post.labels'>
<data:postLabelsLabel/>
<b:loop values='data:post.labels' var='label'>
<a expr:href='data:label.url' rel='tag'><data:label.name/></a><b:if cond='data:label.isLast != "true"'>,</b:if>
</b:loop>
</b:if></span>
</div>
Next, copy this:
.under-title {
margin: 0 0 10px 0;
color:#000000;
text-transform:uppercase;
letter-spacing:0px;
font-family:arial;
font-size:10px;
}
margin: 0 0 10px 0;
color:#000000;
text-transform:uppercase;
letter-spacing:0px;
font-family:arial;
font-size:10px;
}
And place in anywhere ABOVE this part:
]]></b:skin>
</head>
...in pink, you can adjust the margin of the element</head>
...change the style (color, line-height, font) to whatever suits you..
MOVING MORE ELEMENTS UNDER POST TITLE
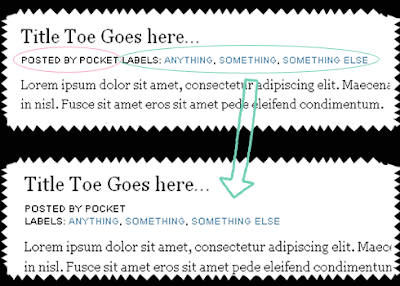
Now, this will be much easier. You just have to CUT the the code of the element (the entire span!), and place it in the "div", like so:
<div class='post-header-line-1'/>
<div class='under-title'>
<span class='post-author vcard'>
<b:if cond='data:top.showAuthor'>
<data:top.authorLabel/>
<span class='fn'><data:post.author/></span>
</b:if>
</span>
<span class='post-labels'>
<b:if cond='data:post.labels'>
<data:postLabelsLabel/>
<b:loop values='data:post.labels' var='label'>
<a expr:href='data:label.url' rel='tag'><data:label.name/></a><b:if cond='data:label.isLast != "true"'>,</b:if>
</b:loop>
</b:if></span>
</div>
..in orange, you can see the main div that defines the style for the whole container, and everything you place there, will automatically "pick up" the style...<div class='under-title'>
<span class='post-author vcard'>
<b:if cond='data:top.showAuthor'>
<data:top.authorLabel/>
<span class='fn'><data:post.author/></span>
</b:if>
</span>
<span class='post-labels'>
<b:if cond='data:post.labels'>
<data:postLabelsLabel/>
<b:loop values='data:post.labels' var='label'>
<a expr:href='data:label.url' rel='tag'><data:label.name/></a><b:if cond='data:label.isLast != "true"'>,</b:if>
</b:loop>
</b:if></span>
</div>
..now, this will place everything in the same line. Hm. If this is to messy for you, you can place each element in it's own row.
All you have to do is change the word:
span into div
 For example, the Labels code will look like this after the change:
<div class='post-labels'>
<b:if cond='data:post.labels'>
<data:postLabelsLabel/>
<b:loop values='data:post.labels' var='label'>
<a expr:href='data:label.url' rel='tag'><data:label.name/></a><b:if cond='data:label.isLast != "true"'>,</b:if>
</b:loop>
</b:if></div>
..in orange, you can see we changed span into div...<b:if cond='data:post.labels'>
<data:postLabelsLabel/>
<b:loop values='data:post.labels' var='label'>
<a expr:href='data:label.url' rel='tag'><data:label.name/></a><b:if cond='data:label.isLast != "true"'>,</b:if>
</b:loop>
</b:if></div>
That's it. You can stylize, play, add icons, background.....anything.
.jpg)


0 comments:
Posting Komentar